Monday, May 04, 2009

10 Must Have WordPress Plugins

10 Essential Plugins Every Modern Wordpress Site Should Have

Posted May 4, 2009 in Tools/Resources, Web Design 20 Rockin' Comments »

Essential Wordpress Plugins

One of the many benefits to WordPress, one of the most popular blogging platform and Content Management System (CMS), is that it is open source software with a very large and dedicated community. There are so many great developers working to make WordPress the best that it can be, that there are thousands of free plugins available to enhance the platform's default functionality.

There are, of course, too many plugins to list here, so in this article we're just going to point out the essentials… what I consider to be the bare minimum "can't live without" list of plugins that should be installed with just about any new Wordpress installation.

If you are new to WordPress, this basic list (which is technically not limited to plugins alone) should help get you started on the right foot. Whether you are running a basic brochure site, or a full featured blog, you should be sure your WordPress site includes these essentials.

First Steps

Permalinks

Once you've installed WordPress, there are a few things that absolutely must be taken care of right away. No if's, and's or but's… Two of these items are already included with WordPress - you just need to configure them.

1. Permalinks

Although not a plugin, this is one of the first items that should be setup in WordPress. Permalinks give your blog posts and pages a "pretty" url. Something like yoursite.com/category/post-name/ as opposed to yoursite.com/p=?1234 - not only is this easier on the eyes, but it is SEO friendly since it incorporates keywords into your URL.

In theory, this is a quick and easy setting to change. However, I have run into the situation on some web hosts where you have to manually update the .htaccess file for this to work properly.

You can update your Permalink structure under the Settings tab in the admin area.

2. Permalink Redirect

Related to Permalinks, is the Permalink Redirect plugin. This one doesn't come with WordPress, however they go hand-in-hand together. This plugin takes the basic Permalink settings a step further by ensuring that there are no excess characters in your URL - in the event there are excess variables, Permalink Redirect sends users to the correct URL.

This plugin is pretty much all taken care of behind the scenes - once you've installed it, there is nothing for you to configure.

3. Akismet

If you are simply using WordPress as a CMS for a brochure type site, this is a step you can skip. However most people take advantage of WordPress' blog feature (it's primary function). If this is the case, and you have comments enabled on you blog, then Akismet is absolutely essential as well. Akismet is a "smart" spam filter, in that it is able to learn what should or should not be considered spam.

It amazes me the type of spam comments that people and spam bots try to post on blogs. To protect your site from such comments, you will need to configure the Akismet plugin (which comes pre-installed with WordPress) as well as create a WordPress.com API key.

Once setup, you'll be able to view a list of all spam received, in order to confirm that the plugin didn't catch a real comment. This is rare, but if it does happen, you can mark it as "Not Spam" - then just hit "Delete All"  and the rest of the spam comments are gone!

You can enter your API key under the Plugins tab, and manage spam under the Comments tab.

Feed Your Obsession (To Constantly Check Stats)

RSS Feed Subscriptions

If you have a blog, you are no doubt constantly trying to increase the number of subscribers you have. The best way to keep track of this is with FeedBurner.

4. FeedBurner RSS and Email Feed Subscriptions

By default, WordPress automatically creates a feed address for your blog, enabling visitors to subscribe to updates using their RSS Feed Reader of choice. However this default setting is limited in that visitors to your site are only able to subscribe via RSS and you are not able to keep track of subscriber numbers.

By utilizing FeedBurner, you are able to give your visitors the additional option of signing up for updates via Email, as well as letting you track exactly how many subscribers you have.

You can create a free account on FeedBurner and give them your default WordPress feed address (something like yoursite.com/feed/). FeedBurner will in turn provide you with two unique URL's, making it as easy as possible for people to subscribe to your blog updates.

Better yet, it keeps an accurate count of your subscribers that updates on a daily basis. FeedBurner even lets you view a list of subscriber email addresses.

You can place the HTML codes that FeedBurner provides in many different places on your site. It can be hard coded into the WordPress theme PHP files, entered as a Text/HTML widget for your sidebar under the Appearance tab, entered into individual pages or posts, or even included as options for several subscription and bookmarking plugins.

5. FeedBurner FeedSmith Plugin

Once you've setup your feeds with FeedBurner, it is very helpful to also install the FeedBurner FeedSmith Plugin. Without this plugin, you might run into the situation of some people clicking on your FeedBurner subscription URL, and other people finding (or manually typing in) the default WordPress feed address.

Either way, they are signing up for your blog updates, which is great. But, if they go through the default WordPress feed URL, their subscription won't be included in your total subscriber count.

Enter FeedBurner FeedSmith! What this plugin does is automatically redirect any feeds coming from WordPress through FeedBurner, so that it is included in your total subscriber count.

For example, if you click the link going to this blog's default WordPress feed URL:

You'll see in your address bar that it is automatically redirected to FeedBurner:

This redirect ensures the new subscriber will be included in your subscriber count.

You can enter your FeedBurner feed URL under the Settings tab.

Get Analytical - Comprehensive Stats Tracking

Comprehensive Stats Tracking

As with the obsession to check subscriber stats, comes the obsession to track visitor stats, as well. To aid in this is a wide range of statistics and analytics programs.

6. Google Analytics

Google Analytics is perhaps the most popular of the various stats programs available. It lets you track an amazing amount of visitor information - such as the number of visitors to your web site, how they found your site, what web browser they are using, etc.

Frequently analyzing visitor trends is a smart move for any web site owner, as it will give you a good idea of what the most popular content on your web site is, what search terms people are using to find you, what pages people are linking to on your site, etc.

Having a good view of visitor trends will help you to optimize your site further by letting you know what type of information people are looking for on your site, so you can provide even more helpful content. It'll also give you a better idea of how you can update your site for better search engine optimization.

You can add the tracking code near the end of your footer.php file, just above the </body> tag.

Search Engine Optimization

Search Engine Optimization

One of the great benefits to having a blog is that by nature it is a type of web site that is frequently updated. Having frequently updated content is a GREAT benefit for Search Engine Optimization (SEO). WordPress itself has many features that are great for this, but coupled with a few additional plugins, it can't be beat!

7. All In One SEO Pack

All In One SEO Pack is one of the more popular WordPress plugins in regards to SEO. Ask just about any expert WordPress user out there what SEO plugins they suggest, and you can bet this one is at or near the top of their list.

All In One SEO Pack gives you numerous items that you can control from the WordPress admin area. On a static web site, things like the Title tag, Description and Keyword meta tags must be hard coded into the HTML of the site.

With All In One, you are easily able to set these default tags for your home page through the WordPress admin area, without knowledge of HTML. Even more important, however, is that you are able to set specific tags for each individual page and post, as well. By default, if you do not manually update these, it will pull text from the post itself. Although this is quite helpful, you'll ideally want to hand-craft the proper tags for each post.

You can edit the default information under the Settings tab, and update the information on each page/post under the post writing area.

8. Google XML Sitemaps

Many search engines - in particular Google, Yahoo!, MSN and Ask.com - utilize specially formatted XML Sitemaps in order to properly index all of the pages on your web site.

The Google XML Sitemaps plugin will automatically create this file for you, as well as update itself a regular basis by adding new pages or posts to the Sitemap file. The file generated includes a list of all the URL's on your site, as well as additional information, such as the priority of the page, date a page was last modified, etc.

While having an XML Sitemap on your site does not by itself guarantee that your web site will be indexed by the search engines, it does help ensure that when it is found (usually by you submitting the Sitemap to the search engines - something else this plugin offers), that it can easily find all content of your site. If you happen to have pages that you don't want to be indexed, you can specifically mark those pages or posts, so as not to have them appear in the Sitemap.

You can edit the settings and generate new sitemaps under the Settings tab.

Security and Safe Guarding

Database Backup

I'm sure that most of us know all too well the importance of frequent backups of personal and/or work files on your computer. Hopefully you've never had to learn this the hard way!

Well, your web site is no different. It's crucial to frequently backup both the files on your server (usually by manually downloading files via FTP), as well as MySQL database tables, which are what contain the actual content (text from your pages and posts, comments, settings, etc.) for your WordPress driven web site.

9. WP DB Backup

Absolutely essential for ALL WordPress sites is the WP DB Backup plugin which can backup your entire MySQL database. This plugin provides several options for backups - for example, you can do a manual backup that will let you download the file to your computer, save it on your server, or send it to you via email.

Even more convenient, is the option to set the plugin to run automatically, letting you backup your database on an hourly, daily, twice daily or weekly basis, depending on how frequently you make updates to your web site.

WP DB Backup is somewhat like insurance - it's something you hope you never have to use, but it is a lifesaver if you do end up needing it. In the event something in your database goes terribly wrong, you'll be able to restore your site content with the most recent backup file created with the plugin.

You can select from the backup options under the Tools tab. Please remember, however, that this just backs up the Database tables - you'll occasaionally want to download the site files files (PHP files, images, etc.) that can be accessed via FTP.

What's On Your Must Have List?

Share Your Must Have Plugins

This is obviously just the beginning, as these are only a fraction of the seemingly limitless list of things you can do to customize and enhance your WordPress driven web site.

In particular are many plugins that can greatly improve upon a default WordPress blog - such as integration with social bookmarking sites, comment enhancing plugins or tweaks, photo gallery plugins, and more - certainly enough to warrant another post (or ten) of their own!

10. ____________________

For the WordPress developers out there, we'd love to hear from you! If you were setting up a new WordPress site and were limited to the plugins / feeds / tweaks / settings, etc. above… and only one more… what would it be?

Please share in the comments below!

To answer my own question, I'm going to cheat and pick two more plugins. ;)

  • Exec-PHP
    If you plan on putting any PHP code in your posts or sidebar items (something necessary for more advanced customization of WordPress) the Exec-PHP plugin allows you to place PHP code into your pages, posts or sidebar items. Without this, you either get an error, a blank space, or most likely you'll just see the <php> tags appear on your page. The Exec-PHP plugin allows your custom code to actually function - and the more I work with WordPress, the more I find that the possibilities are truly endless!
  • Deactivate Visual Editor
    While Exec-PHP is great, it can sometimes use a little bit of help… If you only plan on putting PHP code in your sidebar items, then you can forgo this plugin. However if you plan to place some additional code on either your pages or posts, you'll need to be sure to ONLY edit these pages using the HTML editor in the admin area. If you switch over to the Visual editor, it renders your code useless. This plugin forces you to use the HTML editor on any pages (or posts) that you specify, ensuring that any PHP code you've added stays fully in tact and functional.


About the author: Selene M. Bowlby is a web designer and front-end web developer with over 10 years of professional experience in the design industry. After taking the "freelance plunge" in 2008, she runs her company, iDesign Studios full time, where she specializes in creating custom web sites for other small businesses.

Create a 1 Page Portfolio

How To Build Your Own Single Page Portfolio Website

How To Build Your Own Single Page Portfolio Website

A great looking portfolio site is crucial for any designer to instantly present their work to potential clients or employers. A simple, single page site can do this effectively by displaying three key features of large header with short introduction, examples of your work and methods of contact all in one, extremely browsable page. Let's take a look at producing a single page portfolio concept in Photoshop, constructing the page in XHTML/CSS and adding some fancy functionality with jQuery.

NET Magazine

Last month, I had the pleasure of writing an article for internationally renown NET Magazine, also known as Practical Web Design in the US. The article titled Create Your Own Single Page Portfolio Site with XHTML/CSS and jQuery appeared in issue 188. The folks over at NET magazine have kindly allowed the article to be republished here on Blog.SpoonGraphics for those who might have missed it. I highly recommend checking out the new issues of NET magazine, and to catch them on Twitter for some handy web design tips and tecniques.

NET Magazine

Your online portfolio is your place to introduce yourself to the world and showcase your work and skillset. Once upon a time the traditional leather slipcase was the standard form of showing employers and clients what you can do, nowadays a personal website is your main selling point. Sure, you could use websites such as Flickr, DeviantArt or similar to produce a quick and easy collection of work, but we're wanting to look professional here, and nothing beats your own hand crafted site sitting pretty under your personalised .com domain name.

Personal Design Portfolio

What we're looking to achieve, is to build a simple website that compiles the important information of who you are, what you do, examples of your work and methods of contact. These are the key points anyone looking to hire a designer will need. The site also needs to look nice, but not to be too in-your-face that it takes the limelight from the examples of your work, so we'll build a clean, structured layout with subtle details. Finally, we also want the site to keep the attention of the viewer, if your website is part of a bunch of job applications we don't want to allow the viewer to lose interest clicking through page after page. Limiting the site to a single page helps display all the information quickly and effectively.
Let's get started with the Photoshop mockup, then move onto the nitty gritty of coding up with XHTML/CSS, and finish off with some fancy features using an awesome jQuery plugin.

Prepare The Document

Start work by opening Adobe Photoshop, create a new document at 1680×1050px. Draw in guides to highlight a 960px wide area to accommodate 1024×768 resolution monitors. We don't want any major page elements straying beyond this point. Also draw out a basic grid to align the page elements to, giving a nice, structured appearance.

Add Some Texture

Fill the document with a soft beige colour, then go to Filter > Noise > Add Noise. Enter 3% and check the Monochromatic option. Paste in a concrete texture from Bittbox.com. Fade out the edges with a layer mask and soft brush, then change to the Overlay blending mode at 40% opacity.

Introduce Yourself

Using the grid as a guide, type out your name and a brief introduction of your services in your favourite typeface. Add a very soft Drop Shadow and change the blending mode to Overlay. Emphasise the visual hierarchy by making the name stand out with a larger size and stronger appearance.

Present The Goods

Pick out a small selection of your work and crop them down to thumbnails at 400×180px. Add a 10px stroke at 10% opacity to blend them into the design. Pay particular attention to their alignment to each other, making sure the horizontal and vertical gap between each image is the same.

Methods of Contact

After the viewer has browsed your selection of work, they may want to get in touch or connect. List out your email alongside your main social networks, such as Twitter and Facebook. Use the doodle icons from a previous post here on Blog.SpoonGraphics.co.uk to spice up the links. Add a Color Overlay to blend these into the site colour scheme.

The Overall Concept

Here we have our graphical concept for our website, laid out exactly how we plan it to look. There's a subtle texture to the design to add some visual interest, a basic colour scheme based around our branding, a selection of our work and a list of methods of contact. Time to take a well deserved break.

Export the Background

Our concept uses the large area of stone texture as part of the design, toggle the visibility of all the other layers and copy a large section of the graphic. Save for Web and tweak the compression to find a happy medium between file size and image quality.

Export the Page Elements

Continue cutting up the document and exporting the individual files. Due to the cool typeface and effects used on the text, we'll have to export these as images also. However you could always sacrifice small design features in favour of web safe font styling, or even technologies such as SiFR.

Optimise Using Sprites

When it comes to exporting the icons, we can combine these files into a single sprite graphic. Copy each icon in turn and stack them on top of each other in a new document, then Save for Web. This reduces what would have been 7 image requests into 1, for a speedier page load.

Write Up the XHTML

Start work writing up the XHTML in a coding application of your choice. Pay attention to using the most natural HTML tags for each page element, such as H1 tag for the largest title, H2 for the smaller headings and UL for the lists of portfolio images and methods of contact.

Style it Up with CSS

With the relevant HTML tags in place, CSS styling can be added to change the appearance of the code. Begin with a reset to remove any browser specific or default styling. The repeating texture can be attached to the BODY, while the larger background can be used along with a page-wrap DIV.

Lay Out the Page Structure

Style the container div with a specific width and add margin: 0 auto; to align the div centrally on the page. The headings can also be styled using the background-image property. Don't forget to shift the default text off-screen using -9999px. This is a commonly used CSS image replacement technique.

Float The Thumbnails

By default an unordered list will display vertically with ugly bullet points, but the good old UL can be extremely versatile with the help of CSS. Float the portfolio thumbnails to the left to lay them out side by side, then add some padding and margin to space them out just like the concept.

Put the Sprite Into Action

The image sprite we produced earlier can be implemented with CSS. Style the #footer ul li a with any generic options such as margin, padding, color and font-size, as well as adding the contact-icons.jpg background-image and setting to no-repeat. Then for each individual anchor class, target the appropriate icon using the background-position rule.

Spicing Up With jQuery

By default the image links for the portfolio will simply open in the browser, but that's boring! With the use of some awesome, ready made plugins along with the jQuery framework we can easily add some great looking effects. Download the jQuery Lightbox package from Leandrovieira.com.

Copy The Files

The jQuery lightbox downloads as a complete example, pick out the files we need and copy them to your own project folder. We need jquery.js, jquery.lightbox-0.5.js, jquery.lightbox-0.5.css and the 5 image files. Link up the Javascript and CSS files in the HEAD of your HTML document. Then, write the jQuery script to target the portfolio links.

The Completed Website

With the jQuery functionality in place our website should be looking spot on. We have a simple one page site, with short introductory sentence, a collection of work examples that launch with a stunning animated effect and a range of contact portals. Our website is complete, or is it?…

Browser Testing

It's crucial to check our site in a range of everyday browsers. Our valid code might look great in Firefox, Safari, Chrome and Opera but Internet Explorer can sometimes display rather strange issues. IE7 seems fine, but IE6 is showing the typical 'stepdown' bug on the footer links. Display: inline to the LI soon sorts that!

Time to Launch

Personal Design Portfolio

With the peace of mind of a correctly displaying site in various resolutions and browsers we can go ahead and place our freshly baked website live for the world to see. Check out the working demo, including a fully commented copy of the stylesheet.

WordPress FREE Gallery Theme

Smashing Magazine ~ we smash you with the information that will make your life easier. really.
Smashing Magazine we smash you with the information that will make your life easier. really.

Download "Gallery": A Free WordPress Theme

Just recently we asked you to let us know what theme you would like us to release next. Among numerous comments we found many request for a gallery-theme that could be particularly useful for portfolios and showcases. At the very same time Christopher Wallace has been designing an advanced gallery-WordPress-theme for the design community and Smashing Magazine's audience. And today finally we are proud to release it – for free, of course.

Gallery WordPress Theme

Gallery is a beautiful, free, gallery-style Thematic child theme for WordPress, designed by Christopher Wallace especially for Smashing Magazine and its readers. It is extremely flexible and can be used as a starting point for design galleries and portfolios.

Screenshot

This theme can be seen in action on MixCSS.com, which is being launched as a high-end design gallery that showcases the true power of the Gallery theme. You can subscribe to the MixCSS.com RSS feed or check out the live site, which acts as a demo for the Gallery theme.

As always, the template is completely free and may be used for any private or commercial project without any restrictions whatsoever.

Screenshot

Gallery is packed with loads of cool features like a jQuery slide hover effect on thumbnails, lazyloading for thumbnails (great if using a lot of thumbnails on one page), built-in social media links for each gallery item and seamless integration with the following plugins: WP-PostRatings, BuySellAds plugin, and Contact Form 7.

Screenshot

If you'd like an endless wall of thumbnails, LazyLoad allows you to show as many posts on the homepage as you'd like, allowing your users to scroll endlessly down the page without having to load hundreds of images right away. This effect mimics "endless scroll."

Screenshot

Gallery also supports WordPress 2.7 threaded comments for an elegant commenting experience.

Screenshot

Social media links allow you to save each gallery item to Delicious.com or post a link to the gallery page in your twitter feed. Social media icons provided by Rogie King.

Screenshot

Features

  • WordPress 2.7 compatible
  • Built on the Thematic framework
  • jQuery hover effects
  • 'Save to Delicious' link
  • 'Tweet This' link
  • Flexible footer widget area
  • WP-PostRatings integration
  • Contact Form 7 integration
  • BuySellAds plugin integration

Usage/Installation

To use the Gallery Theme, you will need to follow these installation instructions:

  1. Download the latest version of Thematic.
  2. Download the latest version of the Gallery WordPress theme.
  3. Unzip and upload both themes to your "wp-content/themes/" directory.
  4. In WordPress, go to "Appearance > Themes" and activate the "Gallery" theme.
  5. To change the number of items displayed on the home page, go to
    "Settings > Reading" and change "Blog pages show at most" to 28 (4
    rows) or 35 (5 rows) or more for the LazyLoad plugin to work its magic. LazyLoader will automatically delay loading of thumbnails that are out of the user's view.

Adding Gallery Items

To use the default options for the Gallery Theme, here are instructions for creating gallery entries:

  1. Create a thumbnail for each entry sized 125×125
  2. Create a full-sized image for each entry sized 500×375
  3. Upload both images to /wp-content/uploads or use the image uploader in WordPress to upload the images to the same folder
  4. Next, create a custom field called "thumbnail" and enter the
    location of the thumbnail file, for example
    "/wp-content/uploads/design-name-125×125.jpg"
  5. You will need to create another custom field called "full-image" and enter the location of the full-size image in that field.
  6. You may also enter custom fields for "web-url" and "designer" if you want to add additional information to each entry.

Setting Up Star Ratings

  1. Install the WP-Post Ratings plugin from WordPress.org. Activate both the plugin and the widgets.
  2. To switch the type of images to transparent .PNGs, open wp-content/plugins/wp-postratings/wp-postratings.php in a text editor and change the following lines (should be near the top of the document):

    ### Define Image Extension
    define('RATINGS_IMG_EXT', 'gif');
    //define('RATINGS_IMG_EXT', 'png');

    to match this:

    ### Define Image Extension
    //define('RATINGS_IMG_EXT', 'gif');
    define('RATINGS_IMG_EXT', 'png');

  3. Then upload that file back into the plugins folder.
  4. In your WordPress admin panel, click the Ratings > Options link on the left sidebar.
  5. The transparent .PNG stars should be selected by default.
  6. Under 'Ratings AJAX Style' change 'Show Loading Image With Text' to 'No' and 'Show Fading In And Fading Out Of Ratings' to 'No.'
  7. Click 'Save Changes.'
  8. Now click the 'Ratings Templates' on the left sidebar.
  9. Replace the text in the 'Ratings Vote Text' box with the following code:

    %RATINGS_IMAGES_VOTE%

  10. Replace the text in the 'Ratings Voted Text' with the following code:

    %RATINGS_IMAGES%

  11. Click the 'Save' button.
  12. You should now see your star ratings show on the gallery single pages next to the title of the gallery item.

Adding Widgets to the Footer

  1. Make sure you activated the WP-Post Ratings widgets when you activated the plugin.
  2. In your WordPress Admin, click Widgets on the sidebar.
  3. From the drop-down box under 'Current Widgets' select '1st Subsidiary Aside' and click 'Show.'
  4. Drag the widgets you'd like to see shown in this area from left to right (Highest Rated, Most Rated, Recent Comments, etc.)
  5. Click 'Save.'
  6. You should now see your widgets in the footer.

Download the theme for free!

Screenshot

We express sincere gratitude to Christoper Wallace for his truly impressive work. Please let us know in the comments if this release meets your expectations. And if not, please let us know what we could improve in the upcoming releases!

Sunday, May 03, 2009

Online Ad Revenue Blues

The Online Ad Recession Is Officially Here: First Quarterly Decline In Revenues
by Erick Schonfeld on May 1, 2009

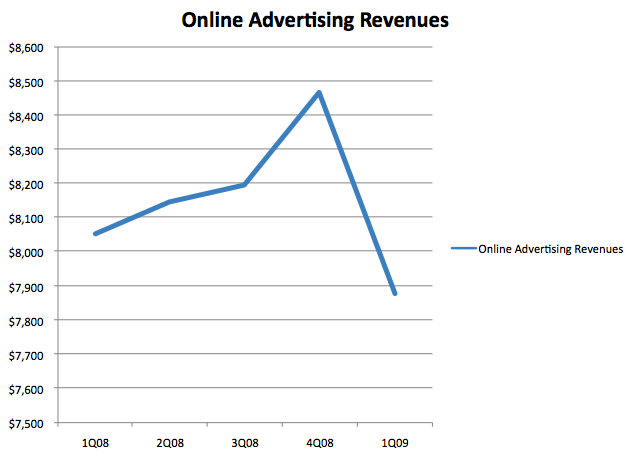
It was the last part of the advertising sector to fall and may be the first to recover, but online advertising is now in a recession. With the four largest Web advertising companies (Google, Yahoo, Microsoft, and AOL) having reported March quarter financials, we can get a pretty good sense of how the sector did as a whole. If you add up the online advertising revenues of these four online advertising bellwethers, the total online advertising revenues for the quarter came to $7.9 billion, a 2 percent decline from a year ago and a 7 percent decline from the fourth quarter.

The growth of online advertising has been slowing down for a while, but this is the first quarter to experience an actual decline in revenues. Given the poor performance reported by all of these companies during the quarter, this shouldn't come as a surprise. Only Google was able to eke out any annual growth, the rest all saw online advertising revenues drop. The fact that Google's advertising revenues represents 68 percent of the total and that it saw modest growth helped to dampen the overall decline.

On an annual basis, the revenue growth just keeps going down from 18 percent growth in the third quarter to 8 percent in the fourth to this quarter's 2 percent dip. On a quarter-over-quarter basis, the decline is even steeper. Other than the slight 3.4 percent rebound we saw last quarter in sequential growth, which appears too have been seasonal, the sequential growth rate has been coming down for at least the past six quarters.
These numbers represent global advertising revenues, and include network revenues paid to affiliates through AdSense and Yahoo's ad network. I've stripped out Google's licensing revenues, and for the other companies include only the advertising portions of their online revenues as reported in their quarterly earnings statements. Those interested in comparing this to more official numbers should note that the IAB, which only recently came out with fourth quarter data, only measures domestic revenues for the industry.

You can see the numbers I'm using in the table below.

Online Advertising Revenues (in millions)


3Q07 4Q07 1Q08 2Q08 3Q08 4Q08 1Q09
Google $4,190 $4,758 $5,086 $5,185 $5,352 r$5,504 $5,331
Yahoo $1,544 $1,590 $1,572 $1,587 $1,563 $1,594 $1,383
Microsoft $670 $860 $840 $840 $770 $866 $721
AOL $540 $620 $552 $530 $507 $507 $443
Total $6,994 $7,828 $8,050 $8,142 $8,192 $8,467 $7,878
Sequential Growth Q/Q
12.73% 2.84% 1.14% 0.61% 3.4% -6.96%
Annual Growth Y/Y


18% 8.16% -2.10%

Update: For everyone complaining in comments about my top chart because it doesn't start at zero, here is another one showing the exact same data.

Friday, May 01, 2009

Turn Your Macbook into a Mobile WiFi AP

Setting up Connection Sharing

The first thing to note is that you need to be connected to the internet via an ethernet cable. In this example we'll be sharing a wired connection via Wi-Fi; the reverse is possible, but isn't quite as useful. To get started, open System Preferences and click on 'Sharing'.

Look for the entry entitled 'Internet Sharing' to the left, and click the title to access further settings:

Setting up Internet Sharing

Setting up Internet Sharing

The settings to the right are a great example of how user-friendly OS X is. The available options are very self explanatory, asking you which connection you would like to share and how you would like to share it. To share an ethernet connection wireless, select the options as shown above.

When completed, tick the box to the left of 'Internet Sharing' to enable the service. This will grey out the previous options, enable Internet Sharing, and alter the Wi-Fi icon in your menu bar to illustrate that a connection is being shared.

Simple! You'll now be able to connect to the new wireless network from another Mac, an iPhone, or any Wi-Fi enabled device.

Advanced Configuration

There are a number of advanced settings you can configure if you'd like a little more control over how your Wi-Fi network operates:

  • Network Name: Choose a name that you'd like to represent the connection
  • Channel: This allows you to avoid conflict with existing networks
  • Encryption: It's a good idea to turn on some form of security, to prevent others connecting to the network you create
Advanced Settings

Advanced Settings

Conclusion

A few different uses for this functionality spring to mind, and it can be far handier than is immediately obvious. How about creating a stronger Wi-Fi network in your office for connecting mobile devices (where 3G may not be available)? Alternatively, have you ever considered establishing a small Wi-Fi network in a hotel room where only ethernet is available?

A whole range of scenarios exist for using your Mac as a handy wireless access point, and it can be a useful trick to have up your sleeve.

Tuesday, April 28, 2009

Bypass Corporate Proxy

How to Bypass Firewalls & Get into Blocked Websites in School or at Work with FreeProxy (Windows)

Apr. 23rd, 2009 By Ryan Dube

Okay kids, you've been searching the web for how to get into blocked websites in school, with no luck.  Face it, you're living in a world where your parents and your teachers want to protect you from the vile and nasty evils that lurk on the Internet. Why?  Are there really child predators hiding in every corner? Is it really critical that you are not allowed to check your Gmail account during your free period at school? The reality is that Internet security "experts" around the globe are taking their jobs just a "tad" too seriously.

A 10 Step Guide on How to Get Into Blocked Websites in School

It's important every now and then to buck the system.  If you let these security admins have their way, you'll be blocked from 50 percent of the most useful areas of the Internet. Social networks and email are now valuable and important communication tools. MakeUseOf has done an excellent job covering proxy servers, such as Mark's article on some legitimate uses for proxies, Linda's article on how to access blocked websites with proxies, or Ben's article on 5 methods to bypass blocked sites.  However, in this simple guide, you'll learn how to set up a simple proxy server on your own home PC that you can access from the school computer in order to use your home Internet access to browse the Internet from school.

Don't worry, this isn't some high-level installation guide. I am a Windows geek, but I'm writing this guide for those of you who are not computer scientists, but would still like to figure out the easiest way to get into blocked websites in school. So, let's get started.

Step #1 - Determine Your IP Addresses

This guide assumes that you have a broadband Internet connection, and that you're sitting behind a router. Your first order of business is to write down your computer's local IP address within your home network, and then your router's IP on the Internet (don't worry, it's ridiculously easy).

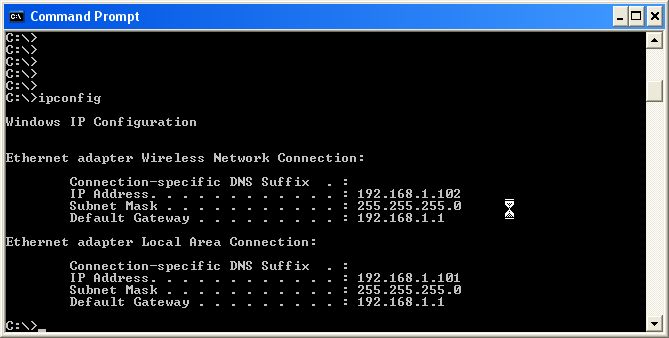
On the computer that you want to use as your home proxy server, open a command prompt (Start -> Run -> type cmd) and type in "ipconfig."

In my case I have two Ethernet cards, but in your case you'll likely just see one "IP Address." Write it down. next, open up a web browser and connect to your router.

Step #2 - Configure Your Router For Port Forwarding

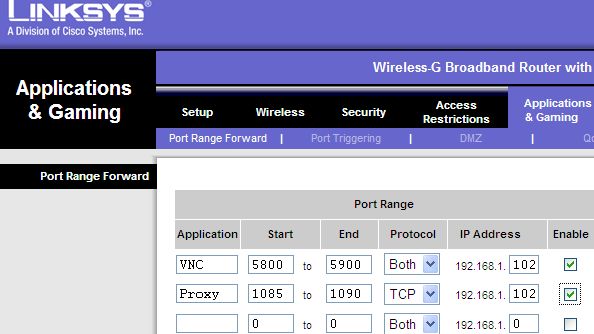
Go into your router admin panel (for Linksys you type the URL 192.168.1.1). You can check the IP address of your router by clicking on the "status" in the admin panel, or you can just visit a site like WhatIsMyIP.

Please note that to access your router you might need a username and password for it. If you don't know user/pass details for your router chances are they are on default. You can lookup those on sites like CIRT or RouterPasswords.

Next, you're going to "poke a hole" in your firewall by enabling port forwarding. For Linksys, this is typically found in the Gaming section under "Port Range Forward." Just find "port forwarding" for your router and type in any nonstandard port number. In my case I just opened up ports 1085 to 1090 and forwarded it to the IP address that I just looked up using the "ipconfig" command. Save your changes and you're halfway there!

Step #3: Turn Your Home PC Into a Proxy Server

Now that you've just told your router to tell all Internet requests on a specific port to go to your home PC, you're going to configure your home PC to relay those HTTP requests out through your Internet account. You do this by installing a free proxy server. For your purposes here, FreeProxy by HandCraftedSoftware.org does the trick.  Download FreeProxy and install it to your home PC.

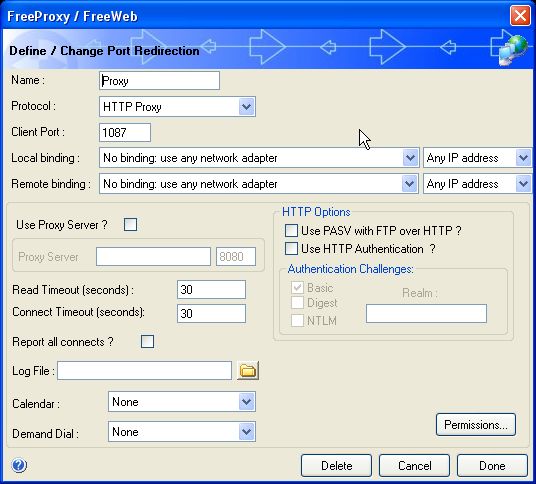
Open up the FreeProxy software and click on the "port." Set the Protocol to HTTP Proxy, and make the port one that you specified in the router. When you click done, you are ready to start using your new proxy. However, every geek reading this is twitching and their faces are all turning red. Why? Well, you've just opened up a virtually unprotected (albeit non-standard) port to the open Internet, and you're forwarding all HTTP requests through your own Internet connection.  That's a major no-no.  While you might hate security weenies, when you're talking about your home PC, a little security is a good thing. Enabling HTTP authentication is a good idea, as is the FreeProxy authentication option.

With these settings you can configure the proxy to authenticate with your Windows logon id/password, or you can set one within the FreeProxy software itself. Either option is definitely a good idea.

Step #4 - Start Your Proxy Service and Bypass Your School Filters

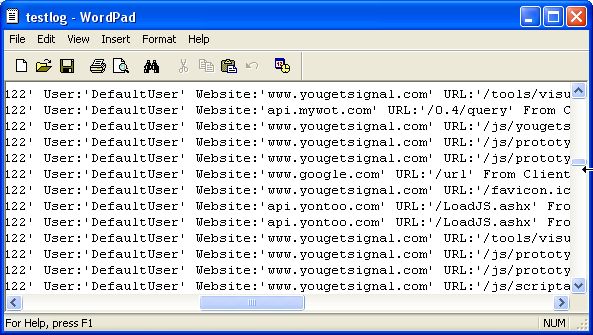
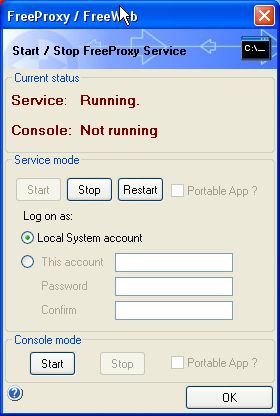
When you're happy with all of the FreeProxy settings and security, all you have to do is start up the service and you're good to go. However, in my case, to prove that the proxy is working properly, I enabled the logging feature.

Don't enable logging normally, because it will consume disk space. However, it's a great way to see how well the proxy is working (and whether or not your security is working properly).  When you're ready, just click the "stop/start" option on the main screen.

Step #5 - Configure the Client Browser

To test out your new proxy server, go to a local library (tip: locate all nearby libraries with public library finder), open up a browser and select options and connections. Configure your LAN connection settings to use a proxy server.

Select manual proxy configuration, and make sure to put the IP address of your router into the "HTTP Proxy" field, and the port you configured into the "Port" field. Now when you use the Internet, you'll notice that it's slower. Images on pages will take a bit longer to load, as the data travels through your home PC, and then to your school PC where you're browsing the net.

Having a slow connection is a small price to pay for being able to access any web page that you want through your own personal proxy that the school firewall won't know to block. After browsing the net for a while through my own private proxy server, I went to the PC and checked the logs. Sure enough, it had logged every site that I'd visited while connected through the server.

FreeProxy works quickly and easily, and you'll have access to a private Internet connection from school or work.

The Battle With Security Goons Rages On

Be aware that the security folks at your workplace or your school will not be content until you have lost all access to the outside Internet world. They will stop at nothing to prevent you from bypassing their firewall. Some corporations modify PC group policies so that users can't even edit their connection settings. In other cases, they've blocked access to proxies that are identified by IP address by blocking all IP addresses in the URL field.  Regardless of their methods, while they continue to block you from checking your Facebook profile, or sending a shout-out to your friends on Twitter, they'll have no choice but to eventually realize that there's no harm in it.  IT departments across the world need to wake up and smell the coffee. The Internet is now a necessity - deal with it.

Do you have a favorite proxy server or free proxy software you use to bypass security filters? Share your opinions and tips in the comments section below.