Showing posts with label FREE. Show all posts

Friday, March 09, 2012

Windows 8 Tips for Professionals


Windows 8 Tips For Professionals


Even if you are a tech savvy user, it will take some time before you understand the workflow and functionality of Microsoft's new Windows 8 operating system. The change from a desktop-orientated system to a Metro and desktop hybrid may throw you off at first as basic features have been changed in the operating system. This guide looks at those features from a professional perspective.
Windows 8 ships with two interfaces currently. The start screen, known as Metro UI, which gets loaded when you log in, and the traditional desktop. It was previously possible to disable Metro UI to only work on the desktop. With recent changes, it is currently not possible. All the tools that worked in the Developer Preview are not working right now.
1. Switching between apps in Metro
You may have noticed that Metro apps and games start in fullscreen, and that you cannot close them down once they are started. There is no close button available, and the only way to get out of an app is to press the Windows key, or use the Charms menu which you can display when you hover your mouse cursor over the lower right edge of the screen.
You can switch between open apps and windows with Alt-Tab, which works exactly as it did under Windows 7 and previous versions of Windows. Windows 8′s Alt-Tab displays both desktop windows and Metro apps.
2. Closing Metro apps
task manager
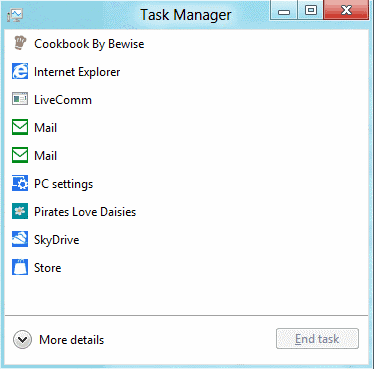
Metro apps keep running on the system even if you leave them using Alt-Tab. They use little to no resources and are basically put into sleep mode. The only option to close them down is to use Ctrl-Alt-Esc to bring up Metro UI's basic Task Manager to do that.
There are several reasons why you might want to close open apps. They first appear when you use Alt-Tab to switch between apps and windows. The more you have open, the longer it takes to find the app that you want to switch to. Privacy, and the urge to run a "clean system" may be other reasons for killing apps when you do not need to use them anymore.
You can click on More Details to display the full Task Manager instead.
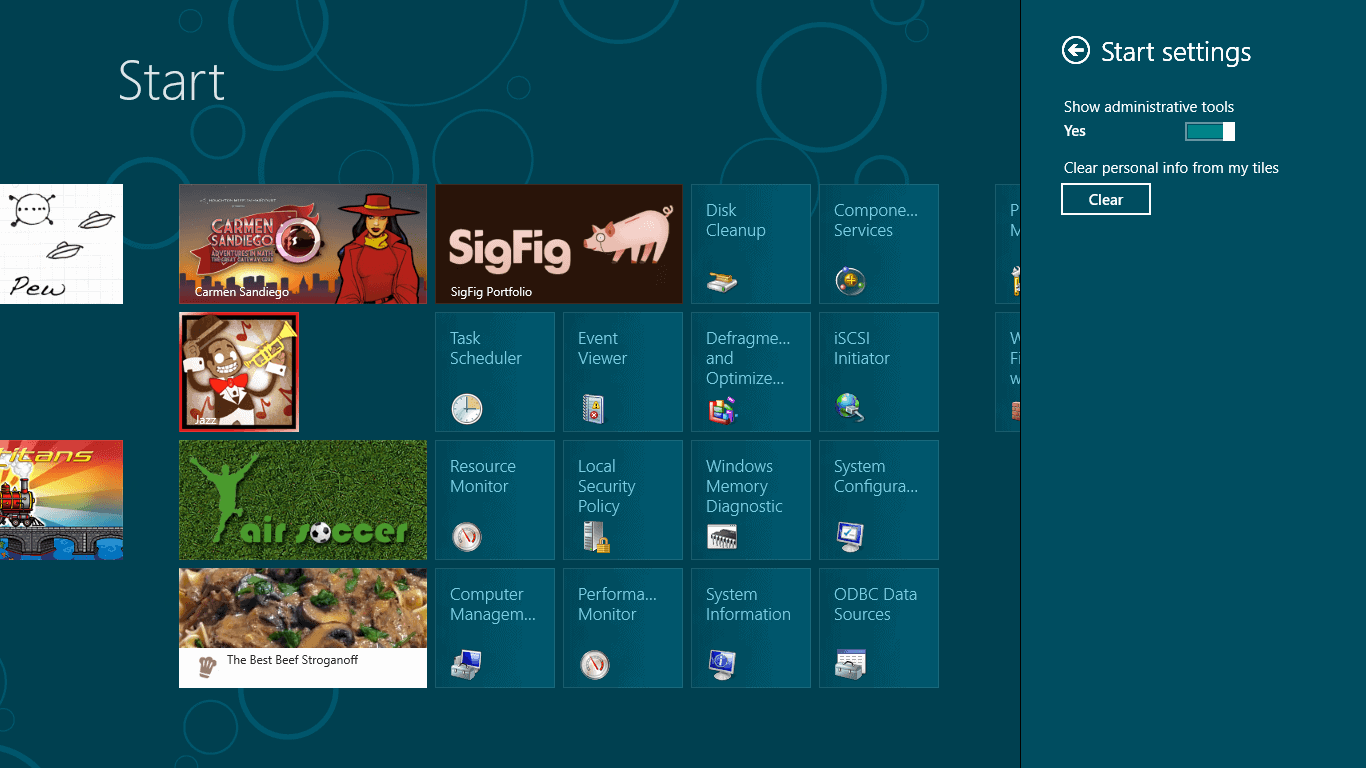
3. Show administrative tools in Metro
administrative tools
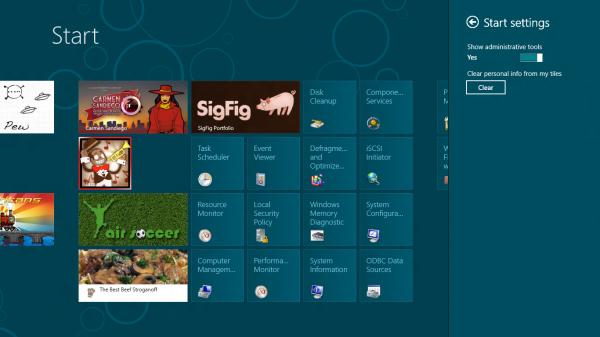
Administrative tools are hidden by default, but you can enable them if you know where to look. Open the Charms menu by hovering the mouse cursor over the lower right corner of the screen. Select Settings, and then Settings again under Start at the top.
Switch Enable Administrative Tools from No to Yes. This adds 18 core system tools like the Task Scheduler, Event Viewer or Computer Management to the Metro interface.
4. MSConfig without startup information
msconfig
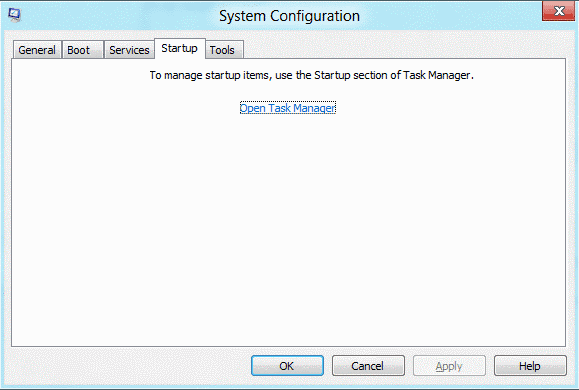
If you have been using the built-in tool MSConfig to manage the system's startup programs, you'd be in for a surprise. Microsoft has moved the information from the system tool into the task manager. MSConfig still displays the list of services, boot information and links to tools though.
5. App History
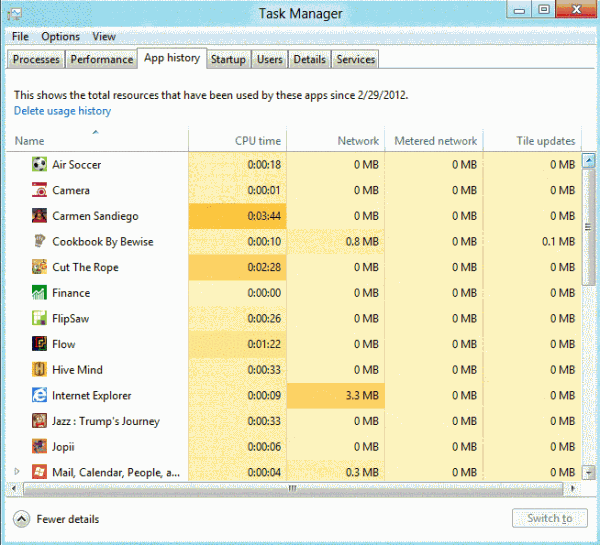
app history
Windows keeps track of a system's application history. Apps in this regards are only Metro applications, and not desktop programs. You see the names of the apps that have eebn used, their cpu time, bandwidth and other information.
You can click on Delete Usage History to remove the resource usage information, but not the apps from the listing. It was previously possible to control the feature in the Privacy settings of the Metro Control Panel. The options were removed in the Consumer Preview.
There may be a setting in the Registry that deals with it, but I have not found it yet.
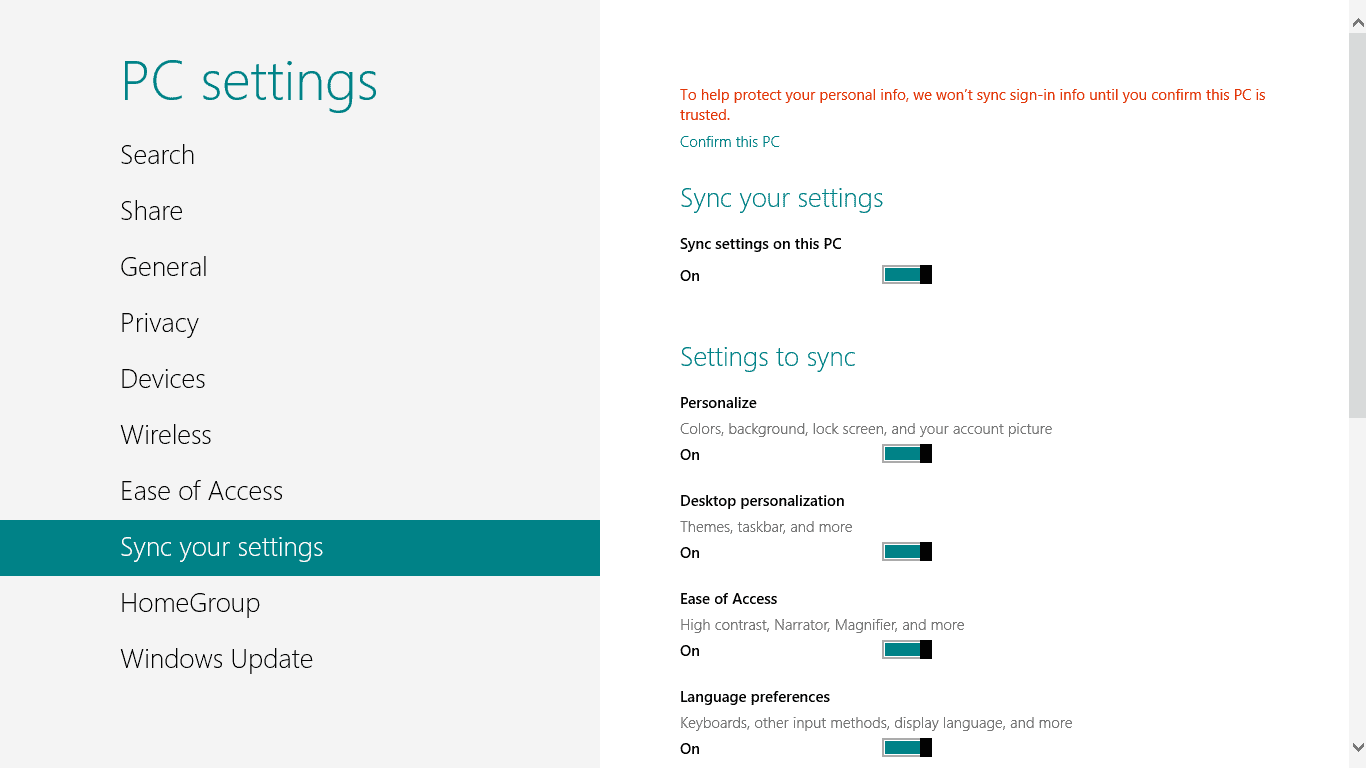
6. Synchronize settings
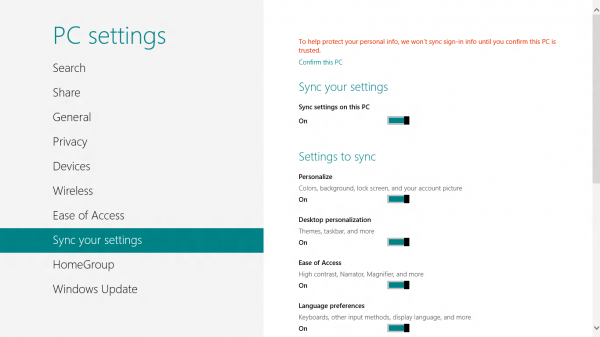
sync your settings
You may remember the announcement that Windows 8 can synchronize customized settings like themes or account pictures with the cloud, to make them available on every Windows 8 PC the user signs in with the same account.
You can configure the feature for each PC individually in the Sync your settings menu in the Metro Control Panel. To get there bring up the Charms menu, select Settings, then More PC Settings. Scroll down until you find Sync your Settings.
You can switch the synchronization feature off for the PC, or customize which information you want synced.
7. Just Type
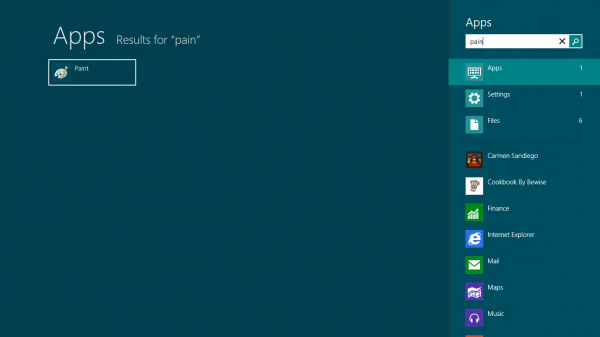
type and run
When in Metro UI, you can just type to launch programs. Windows will not display all files matching the term you enter. This may be confusing at first, as regedit for instance returns no results. You can still hit the enter key to launch the Registry Editor, or other tools like msconfig in Metro.
The type, search and run feature only works on the Metro start page. It won't work if you have a Metro app open, and it won't work on the desktop as well.
8. Drag and Drop
You can drag and drop Metro apps around to sort them the way you want them to be in. This works ok-ish with a mouse or touch screen, and not so well if you only have a trackpad at your disposal. There does not seem to be a way to drag and drop multiple items at once either.
Still, if you want particular apps to appear in different locations, drag and drop is your only option to achieve that goal.
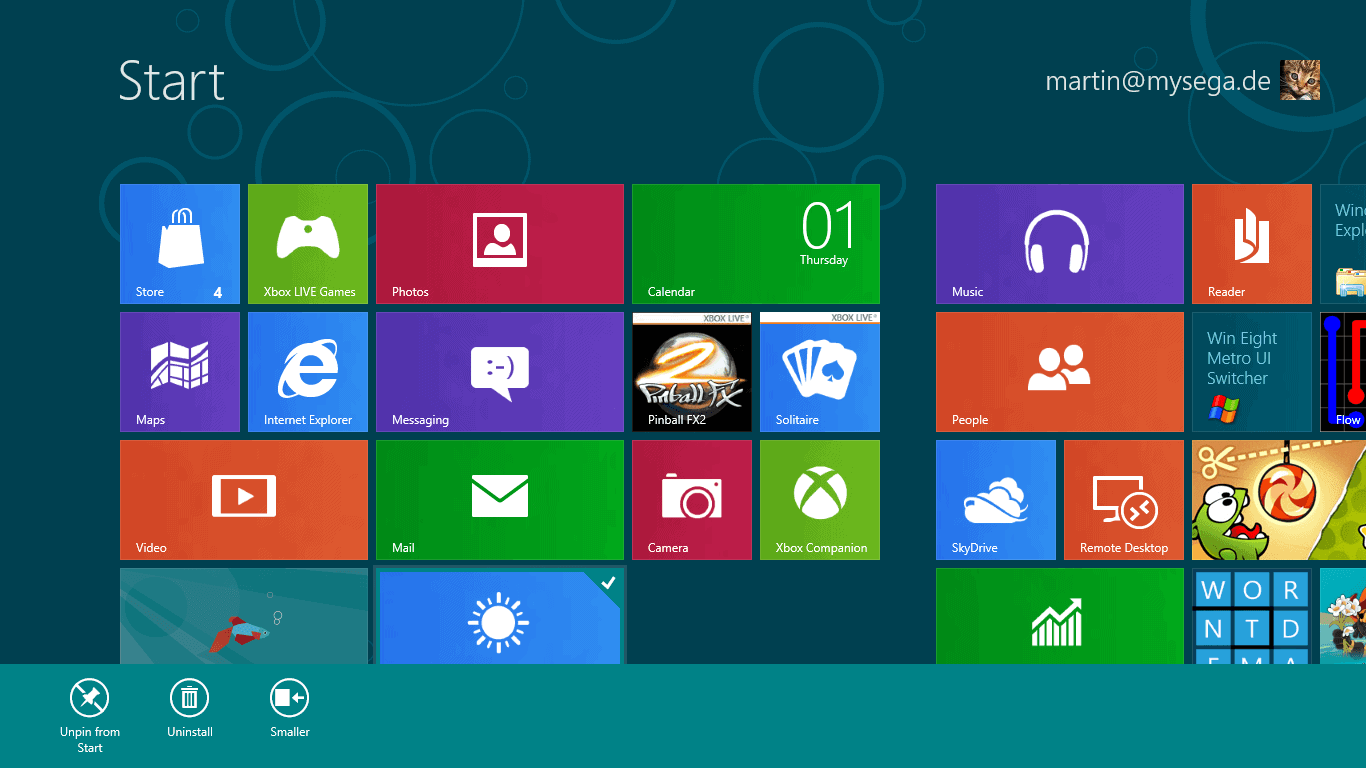
9. Uninstalling Apps
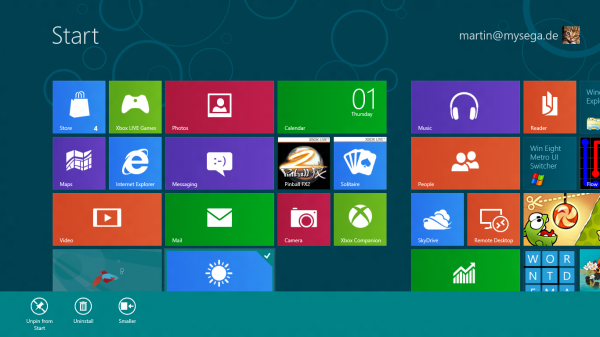
uninstall apps
If you do not use some of the default apps, or want to uninstall apps that you have tried out, you can do so quite easily. Right-click the app that you want to uninstall, and select the Uninstall option from the footer menu afterwards.
You can alternatively unpin the app from the start screen, which would keep it on the system, accessible through search for instance, but not on the Metro UI start screen.
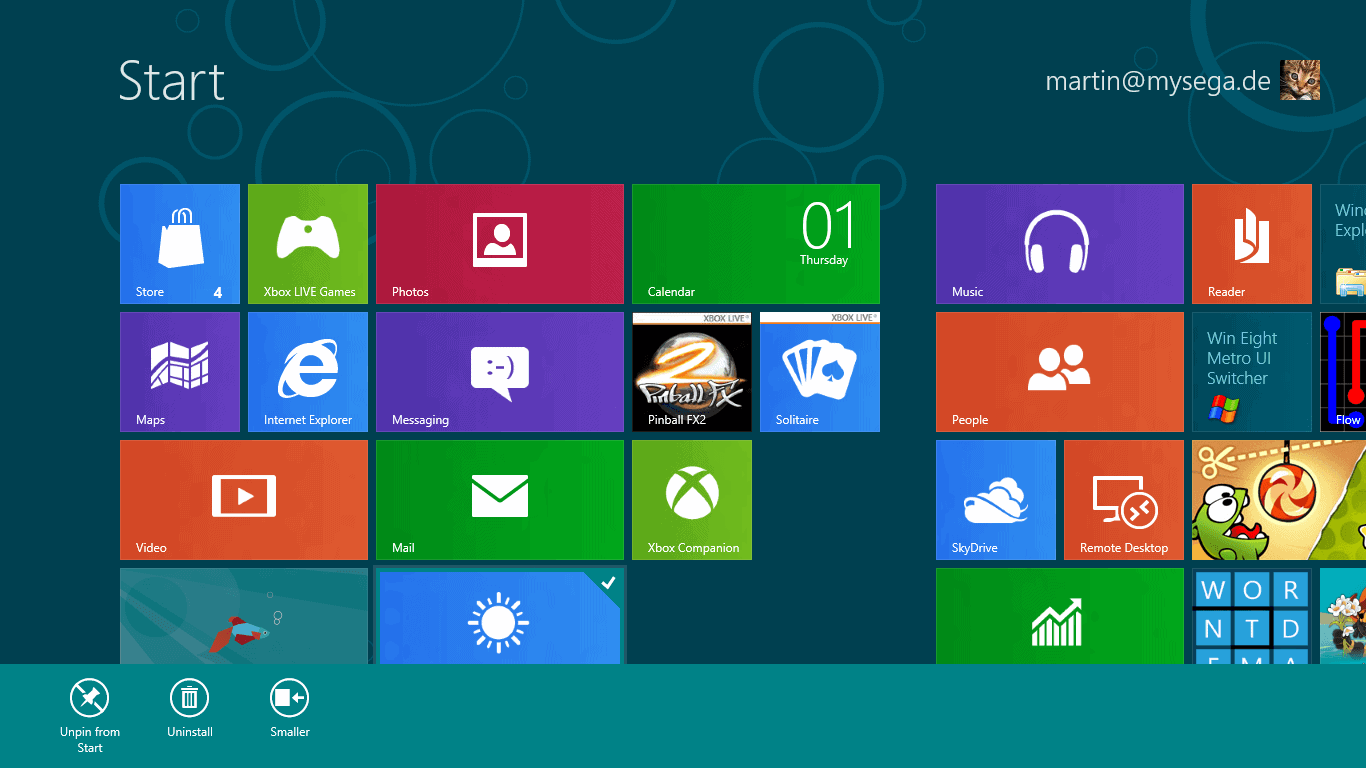
10. Making apps larger or smaller
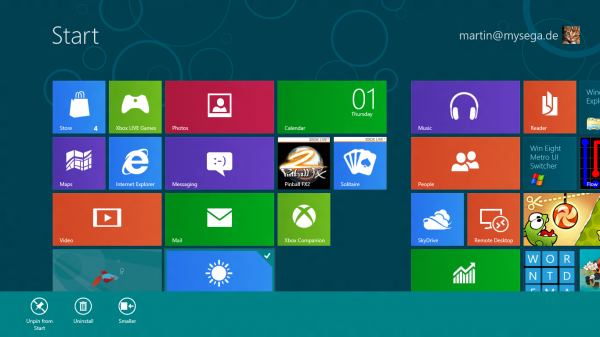
app size
You may have noticed that some apps take up more space on the start screen than others. Some apps are displayed with twice the size of others. A right-click and the selection of smaller or larger decreases or increases the size of the app on the screen.
11. Double-click to zoom out
A double-click on the Charms icon in the lower right corner of the screen zooms out of the start page. This makes it easier to navigate if you have lots of apps installed. You can also drag and drop blocks around instead of single apps.
12. Turn of Windows Store
Windows Store can be disabled in the Group Policy Editor. Type gpedit.msc in Metro and press enter. Now go to User Configuration > Administrative Templates > Windows Components > Store, and enable Turn off the Store application (or under Computer Configuration and the same path).

Organize PDFs with iTunes


Geek to Live: Organize your PDF library with iTunes
by Gina Trapani
Click to view You're not going to spend another tax season scrounging around for receipts and digging through your filing cabinet for the remains of dead trees, wondering if you're claiming everything you should. No siree! Next year, all your tax documents - heck, all your important paperwork - will be converted to PDF files and organized into search-based folders. Your receipts, ebooks, scanned newspaper articles, tax forms, gadget manuals and client contracts will be available at your fingertips whether or not you're by your filing cabinet.
And you can organize them using iTunes .
Wha?
Yes, I know iTunes isn't a document organizer, but it does a surprisingly good job at it anyway. Using iTunes' Smart Playlists and its PDF support, you can build a document library where PDF's are automatically sorted into keyword-based lists. Let's get started.

What you'll need to digitize your documents as PDF's

  1. A scanner. Document scanners are small, sleek and super cheap these days - some as low as 50 bucks - so pick one up to digitize dead tree material like newspapers, magazines, or paper receipts. Your scanner software will most likely provide an option to output the scan to a PDF document. If you're going to digitize stacks of paper at once, you'll want one equipped an auto sheet feeder. (Hardware's not my forte, and the model you get depends on your needs and budget - but this thread has some recommendations from your fellow readers.)
  2. A print-to-PDF program. Windows users should download the free CutePDF writer for the ability to print office documents, email messages, images and web pages to a PDF file. (Seriously, CutePDF is a must-have.) Mac users,printing to PDF is all built into to OS X , so you don't need to do a thing, except choose PDF from the print dialog.

Create a separate iTunes library for your documents

Strange bedfellows, your 1099's and those Beck MP3's, so you'll want to create a whole new "all business" iTunes library for your PDF's. To do so, hold down the Shift key when you launch iTunes (Option for Mac users), and hit the Create Library button from this dialog:
Geek to Live: Organize your PDF library with iTunes
Give your document library a serious name - like "PDFDocuments."
Geek to Live: Organize your PDF library with iTunes
Once you've got a new library set up, you can drag and drop PDF's onto it to add them. But before you do, a couple of tips for dealing with PDF's in iTunes:
  • By default, when you add PDF's to your iTunes library, iTunes copies them into the folder where it keeps its data, leaving you with two copies of the document on your hard drive. It also creates artist and album subfolders, which don't apply to your PDF's (they'll all be "Unknown Artist" and "Unknown Album.") To keep your PDF where you originally stored it, in the iTunes Preferences pane, the Advanced tab, uncheck "Copy files to iTunes Music Folder when adding to library" and "Keep iTunes Music folder organized."
    Geek to Live: Organize your PDF library with iTunes
  • Remove all the music-specific fields from the default listing, like Artist, Album, and Last Played by right-clicking on the column header and unchecking them:
    Geek to Live: Organize your PDF library with iTunes

Develop your tag vocabulary and create Smart Playlists

Once you've added a few PDF's to your iTunes library, you want to organize them into virtual folders - actual playlists. The advantage playlists have over folders is that one document can live in more than one playlist - so that 1099 form from 2006 can live in the taxes list, the 2006 list, the income list, and the 1099 list.
You could manually create playlists and drag and drop your PDF's into them. Even better, you can use Smart Playlists that dynamically populate based on keywords. For example, I renamed the PHP Manual PDF "PHP Manual (ebook code)" then created a Smart Playlist for ebooks, all PDF's where name contains the word "ebook":
Geek to Live: Organize your PDF library with iTunes
But I've also got a "Code reference" Smart Playlist that matches all the PDF's with "code" in the name, and the PHP Manual is listed there, too.
Like all tagging systems, you'll have to develop a vocabulary that works for you and stick to it to make sure all your PDF's appear in the Smart Playlists they should. For example, for tax documents, I name them by year, purpose (income/deduction), and form number (1099, 1098, etc.) So it's easy to see all of 2006's 1099's, or all my income documents overall.

Add your playlists to folders

Geek to Live: Organize your PDF library with iTunes
You can also group like sets of playlists into a folder. For example, my tax document playlists are all in a folder called "Taxes." If I click on the Taxes folder, I can see all the PDF's contained within the playlists in the Taxes folder. Convenient.
If you want, you can use any of iTunes' music metadata fields, like Artist, Album, Genre and year to slice and dice your PDF's, but to me that's taking the "shoving a square PDF file into a circular music file slot" too far. I stuck to adding keywords to the name of the document only. That way, if someday I want to use another program and all my PDF's have keywords in their title, they'll still be easily searchable. (Also, Spotlight, Vista's Saved Search folders and Google Desktop will all find PDF's with keywords in their title - but not other iTunes metadata fields.)

"But PDF's aren't music files": Why - and why not - iTunes

My three requirements for choosing a PDF organizer were: that it's free, cross-platform (at least Mac and Windows), and that it supports tagging (so that one PDF could be "filed" under several "folders.") iTunes fit the bill on all these counts.
However, there are serious drawbacks to using iTunes this way. There is no in-iTunes PDF viewing or previewing - no PDF reader at all, in fact. You'll need to use Adobe Reader, FoxIt or Mac's Preview to actually open the documents. Lastly, iTunes cannot search the contents of a PDF, which also hurts me deeply. (However, Google Desktop Search and Spotlight can.)
If these drawbacks are a no-go for you, there are alternatives. Mac users married to the O, S and X should check out the 
free
 Update: $34 Yep . Windows users who are willing to spend some cash, Rick recommends PaperPort (which goes for about $200 if you didn't get it with your scanner.) As far as I know, PaperPort does not support tagging. A similar application to PaperPort is previously-mentioned, free DocsVault .
Finally, Lifehacker readers have some fantastic input on how they're digitizing and organizing their paper documents. What's your favorite way to get the job done? Let us know in the comments.

Web Security: HTTPS Available from EFF (Chrome and Firefox)


HTTPS Everywhere Keeps Your Personal Information Safe on Over 1,400 Sites, Available for Firefox and Chrome
Chrome/Firefox: HTTPS Everywhere is a simple extension that, with just a one-click installation, can seriously increase your security on over 1,400 web sites by encrypting your connection.
We've talked before about HTTPS, what it does, and why you should use it . Many sites, like Gmail (and Facebook, with caveats ) have options that let you browse with HTTPS always turned on, but the HTTPS Everywhere extension makes this simpler. Instead of turning it on for individual sites, HTTPS Everywhere will automatically routes all your data through a secure connection on any of its 1,400 supported web sites, keeping your information safe and away from prying eyes—in short, it's an extension everyone should have installed.
HTTPS Everywhere has long been a favorite of Firefox users , but today marks the first time Chrome users can get in on the fun, with a new beta version of the extension that quietly sits in your address bar and switches you to HTTPS whenever possible. The Firefox version has also been updated to 2.0, which adds a new feature called the Observatory which, when turned on, detects encryption weaknesses and will notify you when you're browsing a site with a security vulnerability. To read more about the new version of the extension and install it in your browser, hit the link below.
HTTPS Everywhere is a free extension, works wherever Chrome and Firefox do.
New 'HTTPS Everywhere' Version Warns Users About Web Security Holes | Electronic Frontier Foundation

Thursday, February 23, 2012

DataLocker, File Encryption For Windows, Mac, iOS


With cloud hosting taking over much of what we are hosting locally right now in the next ten years or so, it becomes important to protect your remotely saved data from unauthorized access. Some cloud hosting providers encrypt the data automatically, but that is still no guarantee that your data is safe. The algorithm used might be flawed, or the company might retain the right to decrypt your data at any time. This can for instance happen when authorities ask them to do that.


The only solution to this problem is to encrypt your data on your own before you shove it into the cloud. We reviewed BoxCryptor before which added an encrypted layer around your data before it was transferred to Dropbox.
DataLocker provides a similar service. The program is available for Windows and Mac operating system, as well as mobile systems running Apple's iOS system (iPad and iPhone currently only).
You need to request the software on the developer site by filling out a form there. The download link will be in the email that you receive after filling out the form.
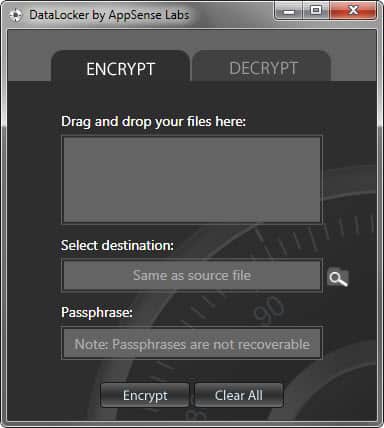
When you install the program you see a basic interface where all of the encrypting and decrypting takes place.
The program will save the encrypted files by default in the same directory the source file is stored in. This is great if you want to secure your local files. If you want to move them to the cloud, you need to manually move them into the right directory or copy them over. Doing that is not overly comfortable though, especially since you can only encrypt files and not folders and all of the files stored inside.
To encrypt files, drag and drop them into the program interface, select a password and change the destination directory if you want. Encrypted files are saved with an ALK extension on the system.
Decrypting works in the same way, only that you need to drag and drop the encrypted files into the program interface instead.
DataLocker is a simple program. It could use a few settings that would make it more usable, like the ability to encrypt folders or better automation to move encrypted files directly into the Dropbox folder.
The Windows version of the program supports both 32-bit and 64-bit editions of the operating system. It requires the Microsoft .NET Framework 4.0 to be installed on the system. (via Caschy )
Enjoyed the article? : Then sign-up for our free newsletter or RSS feed to kick off your day with the latest technology news and tips, or share the article with your friends and contacts on Facebook or Twitter.


Five Best File Encryption Tools

File encryption is your best bet if you want to keep The Man, foreign spies, or your annoying roommates out of your files. Here's a look at five of the most popular encryption tools Lifehacker readers use to lock down their files.

GNU Privacy Guard (Windows/Mac/Linux, Free)

Five Best File Encryption Tools
GNU Privacy Guard (GnuPG) is an open-source implementation of the famed Pretty Good Privacy (PGP) encryption tool—you can read the very interesting history of PGPand how GnuPG came to be here. GnuPG is a volume and individual file encryption tool with support for a dozen encryption schemes, paired keys, and expiring signatures. GnuPG doesn't only provide rock-solid local file encryption; it is, thanks to paired encryption and public key servers, a great tool for encrypted communication. Please note, regular old GnuPG is a command line tool. Check out the list of graphical wrappers and application plug-ins for various operating systems here. The screenshot above is from Cryptophane, a graphical Windows interface for GnuPG.

Disk Utility (Mac, Free)

Five Best File Encryption Tools
Disk Utility is a diverse tool that handles almost any disk-related tasks you'd need on OS X. The utility is capable of creating secure disk images and file volumes encrypted with AES 128-bit or 256-bit encryption. Like most native Mac utilities and applications, Disk Utility and the accompanying encryption blends seamlessly into the OS X experience and makes mounting and unmounting encrypted volumes a breeze. If you've never created an encrypted disk using Disk Utility before, take a look at our previous guide.

TrueCrypt (Windows/Mac/Linux, Free)

Five Best File Encryption Tools
TrueCrypt is a free, powerful, and on-the-fly disk encryption tool. With TrueCrypt, you can create secure encrypted virtual disks or even encrypt entire drives. TrueCrypt is an on-the-fly encryption tool, meaning files are decrypted as you access them and modify them and then encrypted when not in use. Thanks to various optimization tricks and full utilization of the power of modern processors, working within a TrueCrypt volume feels no different than working on a regular unsecured disk. TrueCrypt not only offers strong and transparent encryption—it also offers the ability to create hidden volumes within encrypted volumes for even more secure (and obscured) file protection.

7-zip (Windows, Free)

Five Best File Encryption Tools
Compared to some of the heavyweights in this Hive Five (like GnuPG and TrueCrypt), it might be easy to dismiss the popular file compression tool 7-zip as a lightweight. 7-zip fills a perfect niche for many people, however, by offering simple ZIP container-based encryption. If you're not interested in encrypting a ton of files or maintaining an entire encrypted volume, but you still want to make sure important documents like tax returns or other Social Security bearing documents are locked up tight, 7-zip sports strong AES-256 encryption. Create a new compressed archive, throw your files in it, and slap a password on. Your files are strongly encrypted and stored right alongside your regular documents.

AxCrypt (Windows, Free)

Five Best File Encryption Tools
AxCrypt is a free encryption tool for Windows. Once installed it integrates with the Windows shell and offers simple right-click encryption and decryption of files with AES-256 encryption. Your entire interaction with AxCrypt can take place exclusively from the right-click context menu. In addition to integrating with Windows and offering easy encryption and decryption, you can also use the tool to create self-extracting archives to securely transport files or transfer them to a friend—no AxCrypt installation necessary at the other end.

Related Articles:
Blowfish Advanced File Encryption and Security Tool
Avoiding EFS Encryption Disasters in Windows
Text Encryption Made Easy With Scrambled Egg
Encrypt Instant Messaging with Pidgin Encryption
BoxCryptor, Dropbox Realtime Encryption 

Saturday, February 18, 2012

Top 10 Downloads That Enhance Mac OS X's Built-In Tools


Mac OS X has a ton of great features, but there's always room for improvement. Many developers have felt the same and created a bunch of great apps to enhance OS X's capabilities. Here are our top 10 apps that can power up your Mac to the next level.
Wish this post was about Windows downloads? It was last week !

10. unDock


When you have a bunch of drives connected to your Mac—whether they're mounted via the network or physically attached—it can be annoying to have to manually go through and eject them all. UnDock solves that problem by adding a global hotkey, plus an option in your menubar, to eject them all at once. This is super helpful when you're running out the door and need to disconnect everything safely and quickly.
Download unDock

9. TotalTerminal


Previously known as Visor, TotalTerminal is an enhancement to Terminal, the OS X command line app, that makes a terminal window drop down from underneath your menubar on command. You just pick a shortcut, press the relevant keys, and a Terminal window will drop down. It works just like any standard Terminal window, allowing you to add tabs and choose a style.
Download Total Terminal

8. RestoreMeNot


OS X Lion brought us Restore, a great feature that lets you reboot your Mac and watch all your apps restore themselves to the state they were in before you restarted. In many cases, this is very nice. With some apps, it can get kind of annoying. RestoreMeNot is a system preference pane that allows you to choose which apps will not restore when you reopen them or restart your computer.
Download RestoreMeNot

7. ITEM


OS X offers some really handy pre-configured function keys with its laptop and external keyboards, but some apps (like Adobe Flash) make use of function keys for their keyboard shortcuts. This means you either have to press the Fn key along with the desired function key at the top of your keyboard or temporarily turn off Apple's function key features in the Keyboard system preference pane. Both options aren't ideal, but Palua solves this problem by offering up a hotkey that toggles the mode of your function keys. If you need to switch modes often, this is an enhancement you should download.
Download Palua

6. HyperDock


HyperDock enhances your dock by adding several types of awesome previews. It can preview app windows, display iCal events, and even control iTunes. All you have to do is hover over a dock icon and it will work its magic. HyperDock also allows you to easily resize windows by holding down a modifier key and moving your mouse, can let you snap windows to the edge of the screen, and offers plenty of handy shortcuts to save you time.
Download HyperDock

5. ScreenSharingMenulet


ScreenSharingMenulet is one of my favorite enhancements in Mac OS X. It displays available machines on the network that can be controlled via Mac OS X's built-in screen sharing functionality (a.k.a. VNC ). You can also manually add remote computers so you can easily connect when you're away from your local network. It's a very simple utility, but if you do a lot of screen sharing it will become your new best friend.
Download ScreenSharingMenulet

4. Hyperspaces


Spaces is OS X's built-in virtual desktop feature, and it is pretty nice on its own. If you use it and love it, you'll want to check out Hyperspaces. It'll let you name your spaces, assign different desktop pictures to each space, add labels, and assign specific keyboard shortcuts as well. It also provides tons of built-in shortcuts so you can easily manage your spaces from the keyboard. If you want more out of your virtual desktops than OS X can provide, give Hyperspaces a try.
Download Hyperspaces

3. Cobook


Cobook is our top pick among the Address Book apps for OS X , but while it's definitely its own app it is also an enhancement to the OS X Address Book. Cobook uses the same data already in Address Book, but helps keep it up-to-date by syncing with social web apps like Facebook and LinkedIn. It also provides a quick access from your menubar and is smart enough to understand what you're typing. This makes it easy to add a phone number to a contact or search for specific information without having to worry about telling Cobook what you're typing. It makes contact management on your Mac much easier.
Download Cobook

2. Perian


Perian is known as the swiss-army knife for Quicktime because it takes Quicktime's paltry codec support and makes it capable of playing pretty much any video file you can throw at it. This not only boost Quicktime Player's capabilities, but any Quicktime-compatible application. Even if you use another player, such as VLC, it's really helpful to have Perian installed so OS X doesn't refuse to work with a video file when needed.
Download Perian

1. TotalFinder


Wish that the OS X Finder offered tabbed browsing, a dual-window viewing mode, was able to display folders on top of files in lists, and offered proper cut and paste support? TotalFinder does all of that, plus quite a bit more. If you're not satisfied with the Finder as-is, it's the best OS X enhancement you're going to find. It'll make your $18 poorer, but that's a small price to pay for a number of features the Finder has been lacking for many years.
Download TotalFinder